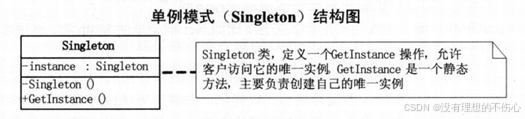
Animation
import SwiftUI

struct AnimationBootcamp: View {

    @State var isAnimation: Bool = false

    var body: some View {
        VStack{
            Button("Button"){
                withAnimation(
                    Animation
                        .default
                        //重复
                        //autoreverses: true:A-B-A-B
                        //false: A-B,A-B
                        .repeatForever(autoreverses: true)){
                    isAnimation.toggle()
                }

            }

            Spacer()

            Rectangle()
                .fill(isAnimation ? .green : .red)
                .cornerRadius(isAnimation ? 10 : 50)
                .frame(
                    width: isAnimation ? 300 : 100,
                    height: isAnimation ? 300 : 100)
                //移动距离
                .offset(y: isAnimation ? 200 : 0)
                //转动角度
                .rotationEffect(Angle(degrees: isAnimation ? 360 : 0))


            Spacer()
        }


    }
}

#Preview {
    AnimationBootcamp()
}
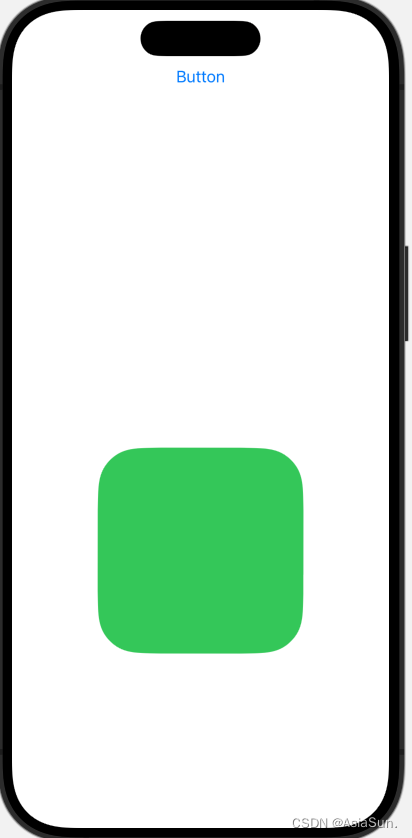
Transition
import SwiftUI

struct TransitionBootcamp: View {

    @State var isShowView: Bool = true

    var body: some View {
        ZStack(alignment: .bottom) {
            VStack {
                Button("Button") {
                    //等价于:isShowView = !isShowView
                    isShowView.toggle()
                }
                Spacer()
            }

            if isShowView {
                RoundedRectangle(cornerRadius: 30)
                    .frame(height: UIScreen.main.bounds.height * 0.5)
                    //从什么地方进,从什么地方出
                    .transition(.asymmetric(
                        insertion: .move(edge: .leading),
                        removal: .move(edge: .bottom)))
                    ///动画:慢进慢出
                    .animation(.easeInOut)
            }
        }

        ///忽略底部的间隙
        .edgesIgnoringSafeArea(.bottom)
    }
}

#Preview {
    TransitionBootcamp()
}
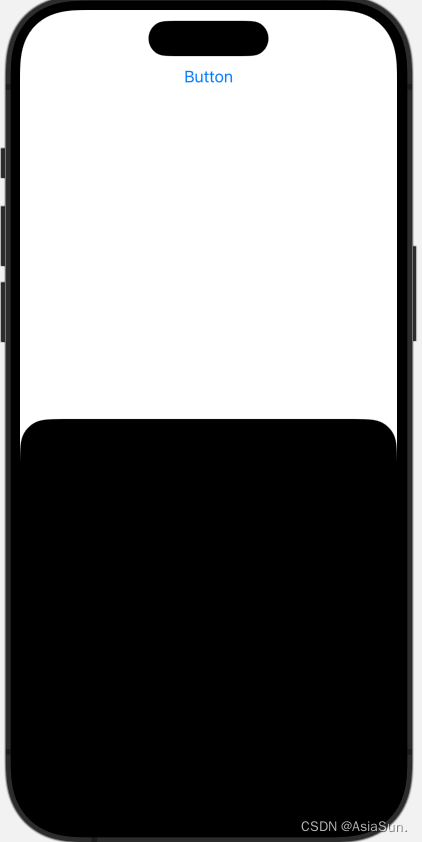
Sheets
import SwiftUI

struct SheetsBootcamp: View {

    @State var isPresented: Bool = false

    var body: some View {

        ZStack {
            ///绿色背景
            Color.green
                .edgesIgnoringSafeArea(.all)//全部填充满

            Button(action: {
                isPresented.toggle()
            }, label: {
                Text("pop另外一个view")
                    .foregroundColor(.green)
                    .font(.headline)
                    .padding(20)
                    .background(Color.white.cornerRadius(5.0))
            })

            ///pop出下一个view
            .sheet(isPresented: $isPresented, content: {
                NextSheetsBootcamp()
            })

            ///全屏出现
            .fullScreenCover(isPresented: $isPresented, content: {
                NextSheetsBootcamp()
            })

            ///方法二:Transition
            ZStack{
                if isPresented {
                    NextSheetsBootcamp(isPresented: $isPresented)
                        .padding(.top, 100)
                        .transition(.move(edge: .bottom))
                        .animation(.spring)
                }
            }
            //设置了视图的堆叠顺序(不加这个,也有动画效果)
            .zIndex(2)

            ///方法三:Animation
            NextSheetsBootcamp(isPresented: $isPresented)
                .padding(.top, 100)
                .offset(y: isPresented ? 0 : UIScreen.main.bounds.height)
                .animation(.spring)
        }
    }
}

///出现的新View
struct NextSheetsBootcamp: View {
    ///固定写法
    @Environment(\.presentationMode) var presentationMode

    var body: some View {
        ///关闭按钮在左上角
        ZStack(alignment: .topLeading) {
            Color.red
                .edgesIgnoringSafeArea(.all)

            Button(action: {
                ///点击按钮,关闭popView
                presentationMode.wrappedValue.dismiss()

                ///方法二、三的关闭
                isPresented.toggle()
            }, label: {
                Image(systemName: "xmark")
                    .foregroundColor(.white)
                    .font(.largeTitle)
                    .padding(20)
            })
        }
    }
}


#Preview {
    SheetsBootcamp()
}
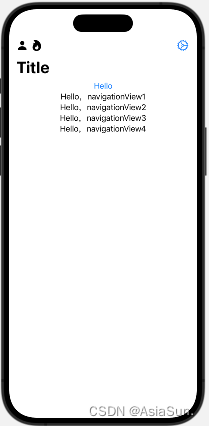
NavigationView
import SwiftUI

struct NavigationViewBootcamp: View {
    var body: some View {
        NavigationView{
            ScrollView {

                ///需要点击跳转的,加上NavigationLink
                NavigationLink("Hello") {
                    //下一个View的内容
                    SecondNavigationViewBootcamp()
                }

                Text("Hello,navigationView1")
                Text("Hello,navigationView2")
                Text("Hello,navigationView3")
                Text("Hello,navigationView4")
            }
            .navigationTitle("Title")
            .navigationBarTitleDisplayMode(.large)
//            .toolbar(.hidden)

            //leading:左边items
            //trailing:右边items
            .navigationBarItems(leading:
                                    HStack{
                                    Image(systemName: "person.fill")
                                    Image(systemName: "flame.fill")
                                },
                                trailing: NavigationLink(destination: {
                                    SecondNavigationViewBootcamp()
                                }, label: {
                                    Image(systemName: "gear")
                                }))

        }
    }
}

struct SecondNavigationViewBootcamp: View {
    var body: some View {
        ZStack{
            Color.green.ignoresSafeArea(.all)
                .navigationTitle("navigationTitle2")

            NavigationLink("Click here", destination: Text("第三个Nav内容"))
        }
    }
}

#Preview {
    NavigationViewBootcamp()
}
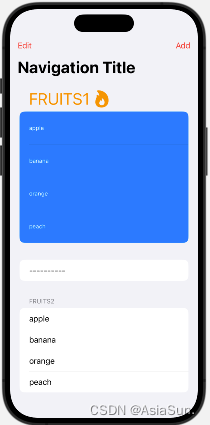
List
import SwiftUI

struct ListBootcamp: View {
    @State var fruits: [String] = [
        "apple", "banana", "orange", "peach"
    ]

    var body: some View {
        NavigationView {
            List{
                Section {
                    ///for循环
                    ///id: \.self,以自己为index
                    ForEach(0..<fruits.count, id: \.self){ index in
                        Text(fruits[index])
                            .font(.caption)//设置cell的样式
                            .foregroundStyle(.white)
                            .padding(.vertical)
                    }
                    ///左滑删除
                    .onDelete(perform: { indexSet in
                        fruits.remove(atOffsets: indexSet)
                    })
                    ///section的背景颜色
                    .listRowBackground(Color.blue)
                } header: {
                    HStack{
                        Text("Fruits1")
                        Image(systemName: "flame.fill")
                    }
                    //设置section的样式
                    .font(.largeTitle)
                    .foregroundColor(.orange)
                }

                Text("----------")

                Section {
                    ForEach(fruits, id: \.self){ fruit in
                        Text(fruit)
                    }

                    ///没有实现,不能正常保存
                    .onMove(perform: { indices, newOffset in
                        fruits.move(fromOffsets: indices, toOffset: newOffset)
                    })
                } header: {
                    Text("Fruits2")
                }

            }
            ///样式,类似group\plain
            //.listStyle(.insetGrouped)
            .accentColor(.purple)//没起作用
            .navigationTitle("Navigation Title")
            .navigationBarItems(
                leading: EditButton(),
                trailing: Button("Add", action: {
                fruits.append("watermelon")
            }))
        }
        .accentColor(.red)
    }
}

#Preview {
    ListBootcamp()
}
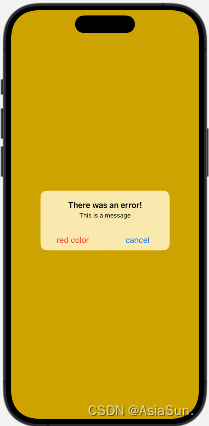
Alert
import SwiftUI

struct AlertBootcamp: View {
    @State var showAlert: Bool = false
    @State var backgroundColor: Color = Color.yellow
    var body: some View {
        ZStack {
            backgroundColor.edgesIgnoringSafeArea(.all)

            Button("Click here"){
                showAlert.toggle()
            }

            .alert(isPresented: $showAlert, content: {
    //            Alert(title: Text("There was an error!"))

                getAlert()
            })
        }
    }

    func getAlert() -> Alert {
        return Alert(title: Text("There was an error!"),
                     message: Text("This is a message"),
                     primaryButton: .destructive(Text("red color"), action: {
                       backgroundColor = .red
                     }),
                     secondaryButton: .default(Text("cancel")))
    }

}

#Preview {
    AlertBootcamp()
}
Actionsheet
import SwiftUI

struct ActionsheetBootcamp: View {
    @State var isPresented: Bool = false
    @State var actionSheetOption: ActionSheetOptions = .isOtherPost

    enum ActionSheetOptions {
        case isMyPost
        case isOtherPost
    }

    var body: some View {

        VStack {
            HStack {
                Circle()
                    .frame(width: 30, height: 30)
                Text("userNane")
                Spacer()
                Button(action: {
                    actionSheetOption = .isMyPost
                    isPresented.toggle()
                }, label: {
                    Image(systemName: "ellipsis")
                })
            }
            Rectangle()
                .frame(width: 370, height: 300)
                .cornerRadius(10)
        }
        .padding(10)

        .actionSheet(isPresented: $isPresented, content: {

            let button1: ActionSheet.Button = .cancel(Text("取消"))
            let button2: ActionSheet.Button = .destructive(Text("删除"))
            let button3: ActionSheet.Button = .default(Text("默认"))


            var otherButtonsArray = [button1]
            var myButtonsArray = [button1, button2, button3]

            return ActionSheet(title: Text("标题"),
                        message: Text("消息"),
                               buttons: actionSheetOption == .isMyPost ? myButtonsArray : otherButtonsArray
            )
        })
    }
}

#Preview {
    ActionsheetBootcamp()
}

ContextMenu
import SwiftUI

struct ContextMenuBootcamp: View {

    @State var backgroundColor: Color = Color.blue

    var body: some View {
        VStack(alignment: .leading){
            Image(systemName: "house")
                .font(.largeTitle)

            Text("SwiftUI Thinking")
                .font(.title2)

            Text("How to use Context Menu")
                .font(.title3)
        }
        .foregroundStyle(.white)
        .padding(30)
        .background(backgroundColor)
        .cornerRadius(30)
        ///长按,而不是点按
        .contextMenu(menuItems: {
            Button(action: {
                backgroundColor = Color.red
            }, label: {
                Label("标题1", systemImage: "flame.fill")
            })
            Button(action: {
                backgroundColor = Color.green
            }, label: {
                Text("标题2")
            })
            Button(action: {
                backgroundColor = Color.yellow
            }, label: {
                Text("标题2")
                Image(systemName: "heart.fill")
            })
        })
    }
}

#Preview {
    ContextMenuBootcamp()
}

TextField
import SwiftUI

struct TextfieldBootcamp: View {
    @State var textFieldString: String = ""
    @State var stringArray: [String] = []

    var body: some View {
        NavigationView{
            VStack(alignment: .leading){
                TextField("请输入文字", text: $textFieldString)
                    .padding()
                    .background(.gray.opacity(0.5))
                    .foregroundStyle(.red)
                    .cornerRadius(5.0)
                    .font(.headline)

                Button("Save".uppercased()) {
                    if isRight() {
                        saveText()
                    }
                }
                .padding()
                .frame(maxWidth: .infinity)
                .background(isRight() ? .blue : .gray)
                .foregroundStyle(.white)
                .cornerRadius(5.0)
                .disabled(!isRight())

                ///由于是绑定了stringArray,
                ///stringArray.append(textFieldString)的时候,stringArray值发生改变,此时,调用这个方法
                ForEach(stringArray, id:\.self) { item in
                    Text(item)
                }

                Spacer()
            }
            .padding()
            .navigationTitle("标题")
        }
    }

    func saveText(){
        stringArray.append(textFieldString)
        textFieldString = ""
    }

    func isRight() -> Bool{
        if textFieldString.count >= 3 {
            return true
        }
        return false
    }
}

#Preview {
    TextfieldBootcamp()
}

这块有点不好理解的地方
比如我先输入123,点击save,则有一个Text(123)
再输入456,点击save,此时,for循环变量,拿出数组的值,而数组有两个元素[“123”, “456”]
应该输出两个Text,即Text(123),Text(456),加上之前的Text(123),此时有:Text(123),Text(123),Text(456)
而实际上,只有Text(123),Text(456)
这是因为:swiftUI的视图是声明式的,在状态改变的时候,重新渲染视图,渲染的内容只有新的部分,即Text(456)
当你在一个数组中添加新的元素时,SwiftUI 会进行视图差异计算,只更新那些真正改变的部分:
- 已存在的元素,不会被删除;视图保持不变,以实现高效复用。
- 新增的元素,会被 SwiftUI 生成新的视图,并插入到视图树中。
TextEditor
import SwiftUI

struct TextEditorBootcamp: View {
    @State var textEditorString: String = "占位字"
    @State var saveTextString: String = ""
    var body: some View {
        NavigationView{
            VStack{
                TextEditor(text: $textEditorString)
                    ///使用这个设置文本框的背景颜色比较好
                    .overlay(
                        Color.gray.opacity(0.3).cornerRadius(10)
                    )
                    .cornerRadius(10)
                    .padding(10)
                    .font(.largeTitle)
                    .frame(height: 300)
                    .foregroundStyle(.red)
                    //这个背景颜色,会将字体一起添加上透明度
//                    .colorMultiply(.gray.opacity(0.3))
                    //这个颜色,区域不是文字的背景色
//                    .background(.gray.opacity(0.3))

                Button(action: {
                    saveTextString = textEditorString
                }, label: {
                    Text("保存")
                        //先设置frame才生效
                        .frame(maxWidth: .infinity, minHeight: 50)
                        .background(.blue)
                        .foregroundStyle(.white)
                        .cornerRadius(10)
                        .padding(10)
                        //这里设置,按钮大小是对的,但是颜色值等不生效,因为是根据顺序渲染的
//                        .frame(maxWidth: .infinity)
                })

                Text(saveTextString)

                Spacer()
            }
            .navigationTitle("导航标题")
        }
    }
}

#Preview {
    TextEditorBootcamp()
}

Toggle
import SwiftUI

struct ToggleBootcamp: View {

    @State var toggleState: Bool = false

    var body: some View {

        VStack {

            Text("按钮状态:\(toggleState)")
                .font(.largeTitle)

            Toggle(isOn: $toggleState, label: {
                Text("改变按钮状态:")
            })
            .toggleStyle(SwitchToggleStyle(tint: .purple))
            .padding(.horizontal, 100)

            Spacer()
        }
    }
}

#Preview {
    ToggleBootcamp()
}

Picker
import SwiftUI

struct PickerBootcamp: View {

    @State var selection1: String = ""
    @State var selection2: String = ""
    @State var selection3: String = ""

    let filterOptions: [String] = [
        "Most Recent", "Most Popular", "Most Linked"
    ]

    //只对segment样式的picker起作用
    init(){
        UISegmentedControl.appearance().selectedSegmentTintColor = UIColor.red

        let attrubutes: [NSAttributedString.Key : Any] = [
            .foregroundColor: UIColor.white
        ]
        UISegmentedControl.appearance().setTitleTextAttributes(attrubutes, for: .selected)
    }

    var body: some View {
        NavigationView{
            VStack{
                Text("pick1选中的是:" + selection1)
                Picker(selection: $selection1) {
                    ForEach(18...100, id: \.self) { item in
                        //tag不能少,因为text只是显示,tag才是给上面selection使用的
                        Text("\(item)").tag("\(item)")
                    }
                } label: {
                    Text("Picker")
                }
                //样式
                .pickerStyle(.wheel)

                //分割线
                Divider()

                Text("pick2选中的是:" + selection2)
                Picker(selection: $selection2) {
                    ForEach(filterOptions, id: \.self) { item in
                        HStack{
                            Text("\(item)")
                            Image(systemName: "heart")
                        }
                        .tag(item)
                    }
                } label: {
                    Text("Picker2")
                        .font(.headline)
                        .foregroundStyle(.white)
                        .padding()
                        .backgroundStyle(Color.blue)
                }
                .pickerStyle(.menu)

                Spacer()
                //分割线
                Divider()
                Spacer()

                Text("pick3选中的是:" + selection3)
                Picker(selection: $selection3) {
                    ForEach(filterOptions, id: \.self) { item in
                        //tag不能少,因为text只是显示,tag才是给上面selection使用的
                        Text("\(item)").tag(item)
                    }
                } label: {
                    Text("Picker3")
                }
                .pickerStyle(.segmented)


                Spacer()

            }
            .navigationTitle("导航栏")
        }


    }
}

#Preview {
    PickerBootcamp()
}

ColorPicker
import SwiftUI

struct ColorPickerBootcamp: View {
    @State var backgroundColor: Color = .green

    var body: some View {
        ZStack{
            backgroundColor.ignoresSafeArea(.all)

            ColorPicker("颜色选择器", selection: $backgroundColor, supportsOpacity: true)
                .padding()
                .background(.black)
                .foregroundColor(.white)
                .cornerRadius(10)
                .padding(30)
        }
    }
}

#Preview {
    ColorPickerBootcamp()
}

DatePicker
import SwiftUI

struct DatePickerBootcamp: View {
    @State var selectedDate: Date = Date()

    let startingDate: Date = Calendar.current.date(from: DateComponents(year: 2018)) ?? Date()
    let endingDate: Date = Calendar.current.date(from: DateComponents(year: 2038)) ?? Date()

    //设置输出的日期格式
    var dateFormatter: DateFormatter {
        let formatter = DateFormatter()
        formatter.dateStyle = .short
        formatter.timeStyle = .short
        return formatter
    }

    var body: some View {

        VStack{
            HStack{
                Text("选中的日期是:")
                Text(dateFormatter.string(from: selectedDate))
                    .foregroundStyle(.green)
            }


            DatePicker("日期选择器1", selection: $selectedDate)
                .datePickerStyle(CompactDatePickerStyle())//默认CompactDatePickerStyle

            //displayedComponents可以具体要日、时、分?
            DatePicker("日期选择器2", selection: $selectedDate, displayedComponents: [.date, .hourAndMinute])
                .datePickerStyle(GraphicalDatePickerStyle())//展开样式

            //in 可以设置时间的起止日期
            DatePicker("日期选择3", selection: $selectedDate, in: startingDate...endingDate, displayedComponents: [.date])
                .datePickerStyle(WheelDatePickerStyle())

        }
        .accentColor(Color.red)

    }
}

#Preview {
    DatePickerBootcamp()
}

![[图解]SysML和EA建模住宅安全系统-13-时间图](https://i-blog.csdnimg.cn/direct/5d8362ddb4234ba0a9eb214f1ae41a8d.png)